


.png#keepProtocol)


Table of Contents
Following the launch of Lead Center in March 2023 come two important updates to Afternic’s product offering. Landing page selection and ownership verification.
Landing page selection
For Afternic sellers, this is one of the most important updates that the company has released.
In short, if you would like to change between Request Price, Buy it Now (BIN), and Cashparking landing pages, you will now need to do so by updating the new Sales Lander settings within your Afternic Portfolio dashboard.
How this works
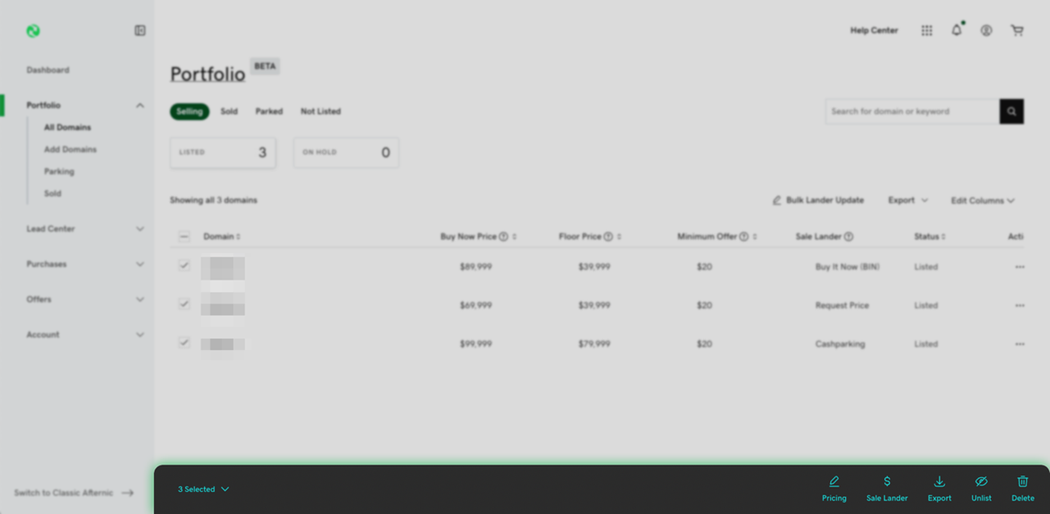
Moving towards the landing page selection system, Afternic’s team has backfilled landing page preferences based on your nameserver settings. This will be reflected in your Afternic account under a new column named “Sales Lander.”

This brings to an end the reliance on changing nameservers in order to change a domain name’s landing page. Going forward, customers already using Afternic nameservers will now use Afternic’s Portfolio dashboard to update their landing page settings either individually or in bulk.
To update your domain names individually, you can use the Sales Lander column, pictured above, to toggle between Buy It Now (BIN), Request Price, and Cashparking landing pages. Changes to this column will be reflected in a fast change of landing pages on your domain name.
Changing landing pages can also be achieved in bulk via two separate methods.
Method 1
Selecting domain names using the on-screen checkboxes will prompt Afternic’s toolbar to appear at the bottom of your screen.
From here, you can select the “Sales Lander” option.
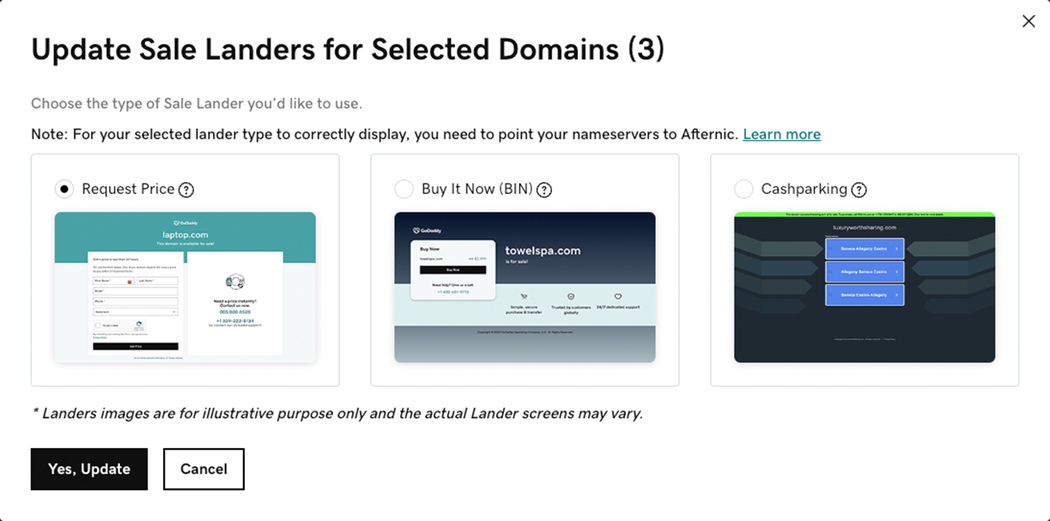
Once this pop-up appears, you’re able to toggle between the three currently available landing page options.
Method 2
The second method is perfect for customers that want to update hundreds of domain landing pages at once.
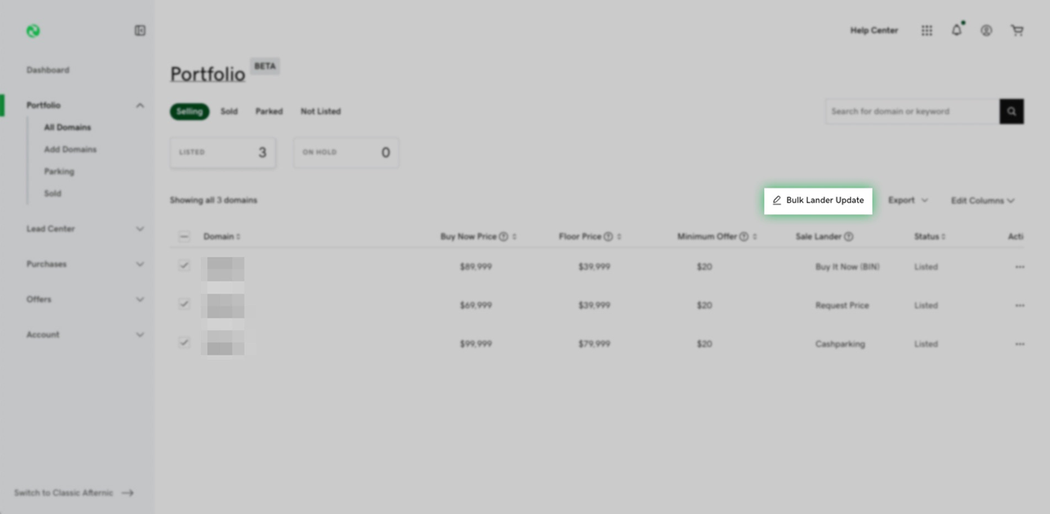
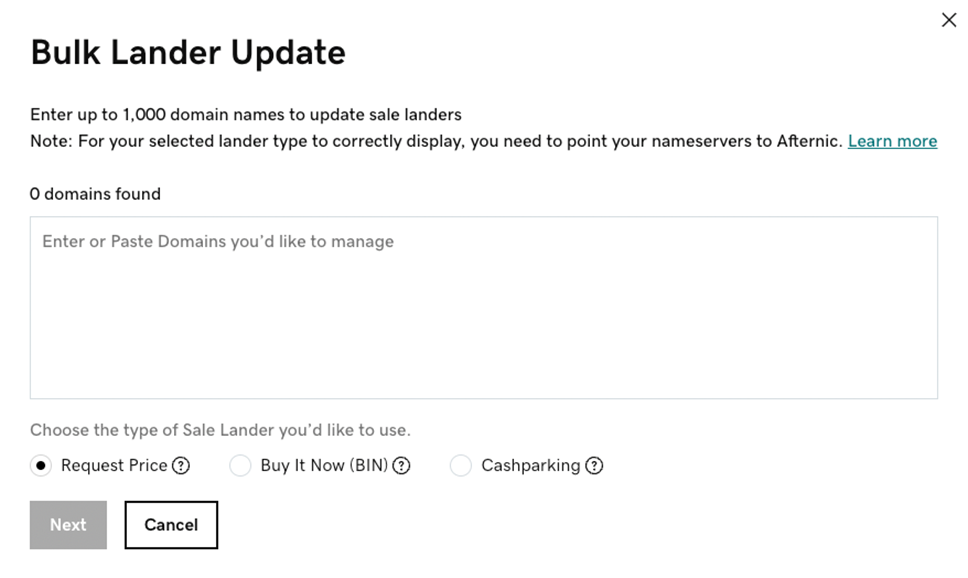
Using the “Bulk Lander Update” button from the Afternic Portfolio Dashboard, you’ll be presented with a pop-up allowing you to paste up to 1,000 domain names. From here, you can quickly change the landing page for the pasted list of domain names.
For sellers with sizable portfolios, this is an extremely efficient way to switch between Afternic’s landing pages. This could be beneficial, particularly if you’re looking to test specific landing pages for specific domain names within your portfolio.
Why we’ve done this
Moving away from a reliance on nameservers as a way to switch between Afternic’s landing pages is something that is designed to improve the experience of sellers managing their domain listings at Afternic.
This also allows Afternic to continue to add more landing page options in the future without having to rely on additional nameserver settings.
Recommendations for adding new domains to Afternic
Any new domains pointed to any Afternic nameservers will default to the Request Price landing page.
Here is the recommended flow for adding domain names to Afternic going forward:
- Set your domain name to ns1.afternic.com and ns2.afternic.com
- Add your domain name to your Afternic account
- By default, your domain name will show the Request Price landing page
- If you want to change the landing page that is shown, this will be done through your Afternic portfolio dashboard
- Any changes to your Afternic landing page selection will, in the future, be actioned from your Afternic portfolio dashboard
For customers already using Afternic nameservers, you will now use Afternic’s portfolio dashboard to update your landing page settings either individually or in bulk.
Ownership verification
Utilizing nameserver and TXT methods, automated ownership verification replaces Afternic’s previous customer services-led verification, providing a faster independent way to remove outdated listings.
It’s a significant step forward for Afternic’s platform.
Adding domain names
You’ll encounter the ownership verification process if you try to add a domain name to your portfolio that is already listed at Afternic.
Adding a domain name to Afternic is something that most sellers are familiar with. Still, the entire workflow has had an overhaul, bringing it into the Afternic 2.0 ecosystem, as you can see below.
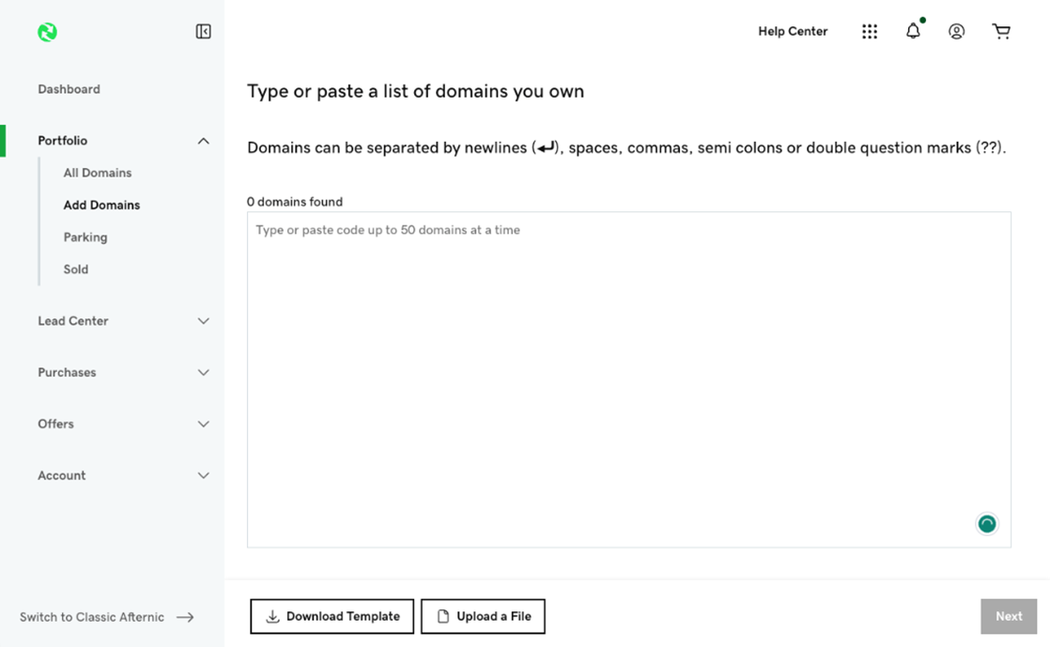
Adding up to 50 domain names at a time can be completed on-screen. There is an option to upload domain names in bulk, too.
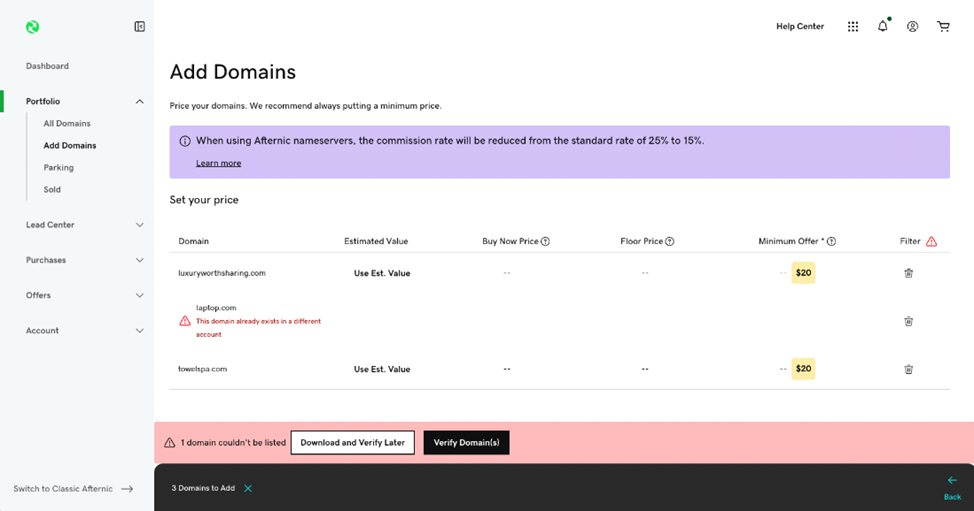
Once you have begun adding domain names to your Afternic account through the on-screen input, you’ll be presented with another revamped screen, prompting you to include pricing for your domain names.
If any domain names you’re attempting to add to your account are already listed at Afternic, the system will alert you with a prompt to verify ownership.
How to use ownership verification
Once you’ve clicked on the “Verify Domain(s)” button, you’ll notice a pop-up with 2 possible means of domain name verification for you to choose from, TXT or nameserver (NS3).
Both options require a simple addition to your domain name’s records, which can be completed via your domain name’s registrar.

Choose either the TXT or the NS3 record and copy the specified code on-screen.
Once you have added the code to your domain’s DNS settings via your domain registrar, you can proceed with the verification by first clicking the “Yes” checkbox and then the “Request ownership verification” button, as seen in the screenshot above.

An on-screen pop-up will inform you that Afternic’s automated verification system is checking your domain’s records to find your verification code.
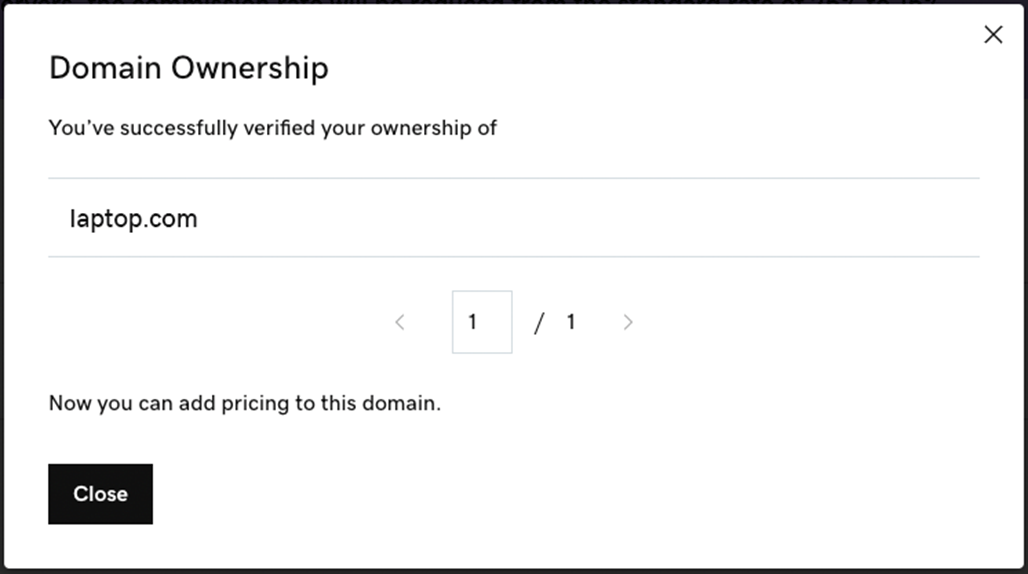
If TXT and nameserver records are already set, it’s likely that ownership verification can be completed within a minute. If so, Afternic will confirm that you’ve successfully verified ownership in the on-screen pop-up.
At this point, you can add pricing to your domain name as you normally would.
5 tips for sellers
1. Bookmark your ownership verification records
Each Afternic account has its own unique ownership verification code. You can easily find your unique TXT and NS3 codes by heading to your new Ownership Settings page at Afternic. For quick access, bookmark this page on your browser.
2. Add DNS records beforehand
While automated ownership verification is fast, it does rely on registrars to propagate DNS records. In some cases, this can take up to 48 hours.
To speed up ownership verification even further, it’s recommended that sellers add their TXT or NS3 code to their domain name before adding a domain name to their Afternic account.
This means that you’ll move through the verification process quicker once you enter the “Add Domains” flow.
3. Verify that you have added TXT or NS3 records
Verifying that you’ve successfully added your TXT or NS3 record to your domain name before adding your domain names to your Afternic account can be beneficial.
This third-party tool can show you your current TXT records, while GoDaddy’s Whois search will show you your domain’s current nameserver configuration.
While checking these tools, ensure that your NS3 or TXT record matches the one found on your ownership settings page.
4. Toggle on/off to see domains that require action

If you’re adding several domain names to your account, and a couple of these require ownership verification, you can click on the warning symbol, as shown above, to only display those domain names that require verification.
5. Download to complete later
If you’re not ready to verify your domain names at Afternic, you can download a CSV list of your unverified domains to action later.
Sign in to your Afternic 2.0 beta account today to begin using ownership verification and lander selection.

.png#keepProtocol "The Key to Boosting Retention")
More Stories
Employee Appreciation Day: How to build a culture of year-round recognition
Data Never Sleeps Turns 11!
George Jenkins’ Alyssa Currie signs first bowling scholarship in school history